@Pette Mini Smart Pipette
Device Overview
Shuye@Pette Mini is a next-generation smart electronic pipette designed to transform manual pipetting into an automated liquid handling experience. It is compact, lightweight, precise, and intelligent. It enhances liquid handling with greater ease, speed, and accuracy. With Shuye@Pette Mini, you can intelligently optimize your experimental workflow, improving both efficiency and result accuracy.
1. @Pette Mini Electric Pipette Overview
Before using @Pette Mini for the first time, please review the key functions and important safety instructions for pipette use described below.
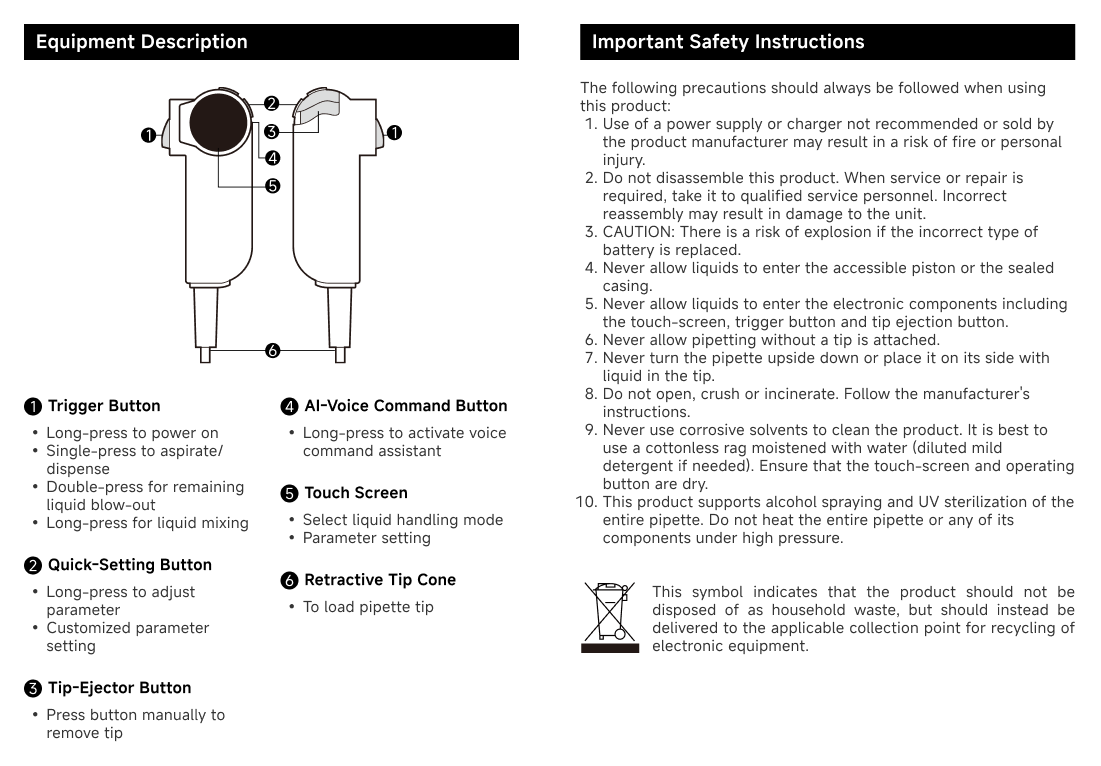
2. Introduction to Equipment Functions
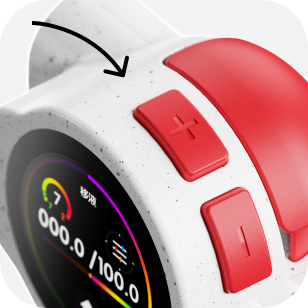
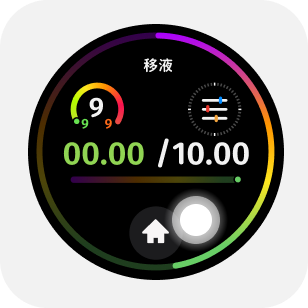
@Pette Mini's user interface is a high-performance color display. Use finger touch for screen navigation, pipette operation, settings, and option selection. The common information and functions available in the menu and screen are shown in the figure.
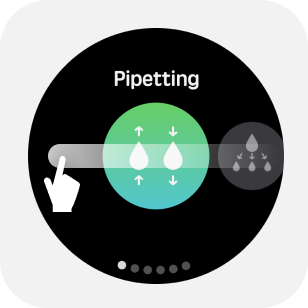
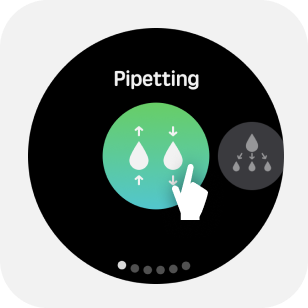
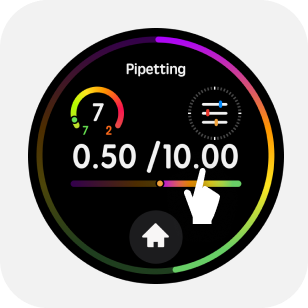
2.1 Pipetting Mode
Pipetting mode allows liquid to be aspirated and the aspirated liquid to be expelled.
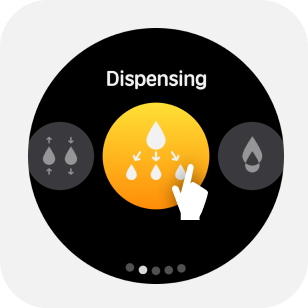
2.2 Equal Volume Dispensing Mode
In equal volume dispensing mode, liquid can be aspirated and dispensed multiple times, with each dispensing delivering the same volume.
2.3 Reverse Pipetting
The reverse pipetting mode is suitable for viscous liquids, high-protein liquids, and volatile substances. In this mode, a volume greater than the set amount is aspirated. The first dispensing step delivers the intended volume, while the second step releases the excess liquid as waste.
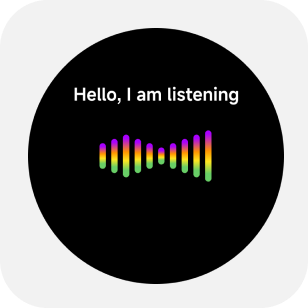
2.4 AI Voice Assistant
The built-in AI voice assistant allows for real-time voice-activated parameter adjustments at any time.
2.5 Cloud Recording
Pipetting operations are refreshed and recorded to the cloud.
You can query and download in [My] - [Operation Log].
2.6 Automatic Self-Calibration
Self-calibrated every time the system is power on.
Guidelines for initial use of equipment
Charge the pipette for at least 5 minutes before using it for the first time. The pipette can be charged using the charging power supply provided with the pipette, a mobile power supply, or by connecting to a computer. If you use a charging power source, @ Pette Mini can perform operations during charging.
1. Power On
Press and hold the trigger button for 3 seconds; a beep followed by a constant screen light indicates that the device is powered on.
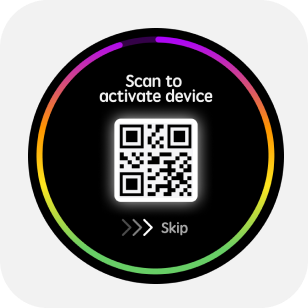
2. Activate device
After the power-on animation, a QR code will appear. Scan the code with App (Android/iOS) or WeChat to activate the device and calibrate the time.
3. Mode menu
Tap the "Home" button on the Home screen to enter the "mode" menu.
The mode menu includes pipetting, Dispensing, reverse pipetting,wireless connection and settings. Swipe the screen to switch to mode, tap the icon in the center of the screen to enter mode.

4. Parameter adjustment
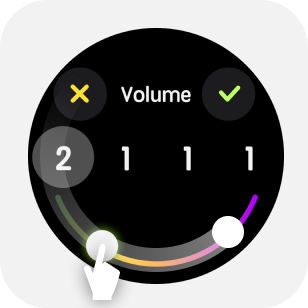
4.1 Tap the upper half of the main screen to enter the parameter menu.
When the device does not inhale liquid, you can click on the upper part of the main screen to enter the parameter menu. Take the volume setting as an example, slide the edge of the screen to adjust the value size.
When setting specific parameters, you can click any number of digits to adjust individually.

4.2 AI voice adjustment
Long press the [AI Button] to start speaking to the pipette.Release button after finish speaking.
You can try saying: "Set speed to 8" "Range 299.1 (two hundred and ninety-nine point one)"
The voice function is only supported in the networked state, as detailed in the Networking Pairing Guide later in the manual.
4.3 Long press the '+' or '-' button to change volume.
Long press to bring up the quick volume adjustment interface and quickly execute number scrolling.
4.4 Volume Quick Operation
Long press the upper part of the main screen to enter the quick volume adjustment.
5. General Operation
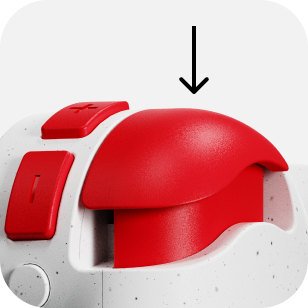
5.1 Install the Tip
Select a tip that matches the pipette's range, gently press, and insert the matching tip onto the nozzle.

5.2 Aspirate/Dispense Liquid
Press the trigger gently to perform the aspiration/dispensing operation.
5.3 Quick Blow-out Under Dispensing Mode
Under dispensing mode, user can double click trigger button to blow-out all remaining liquid in tip.
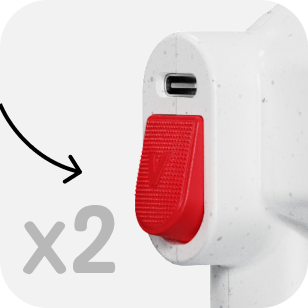
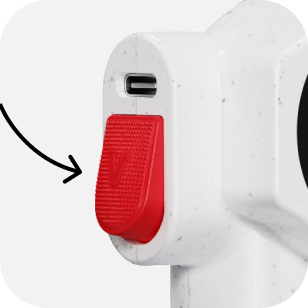
5.4 Tip-Ejection Button
While emptying the liquid, gently press the eject button to remove the tip.
5.5 Liquid Blow-Out
After completing the aspiration and dispensing cycle, double-click the trigger to blow out liquid.
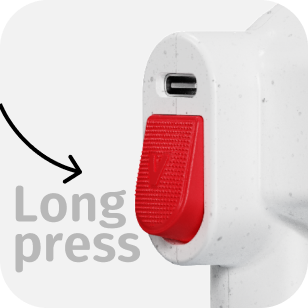
5.6 Mixing
Long press trigger button to perform liquid mixing.
Pipetting mode
"Pipetting" mode can aspirate and dispense liquid at a variable volume.
1. How to use the pipetting mode
1.1 Enter pipetting mode
Select [Pipetting] in the mode menu to enter the pipetting mode.
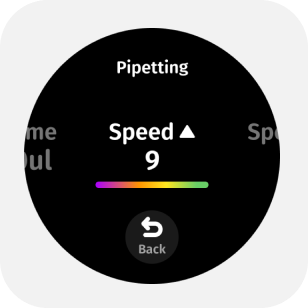
1.2 Parameter adjustment
When the device is not inhaling liquid, you can click the upper part of the main screen to enter the parameter menu.By swiping or tapping the screen, you can adjust in the parameter menu:
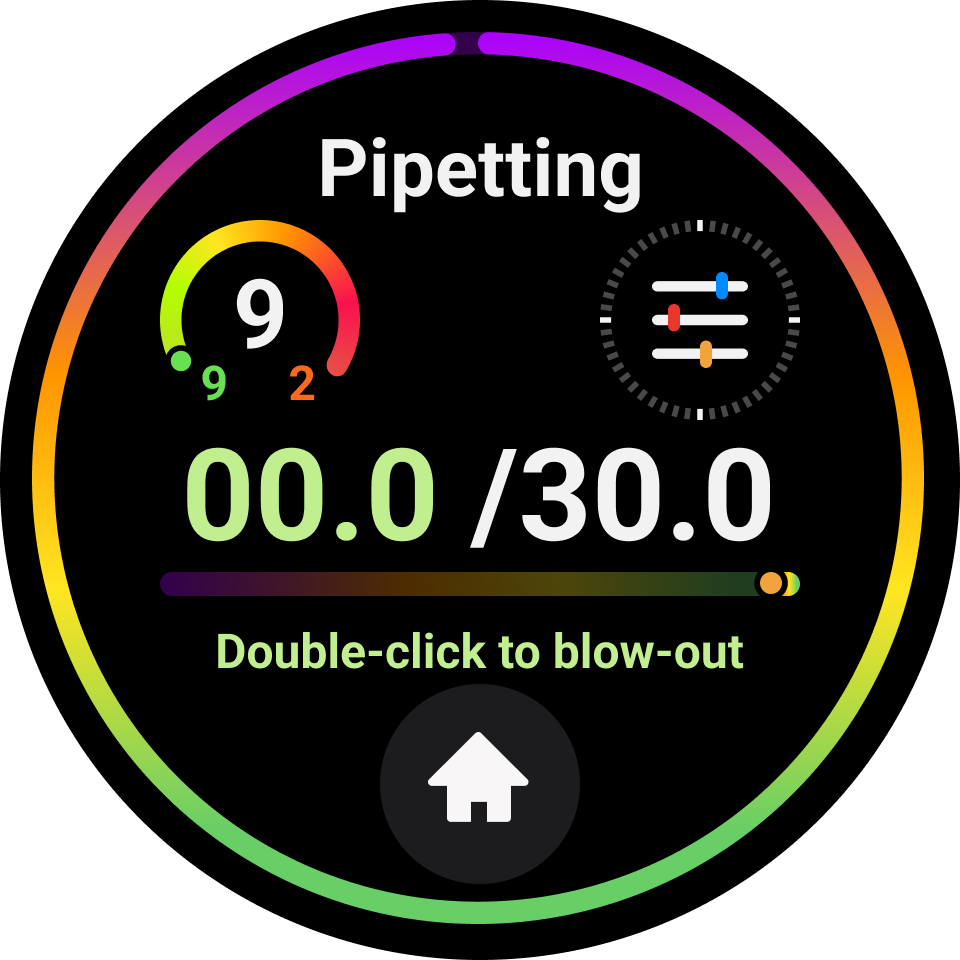
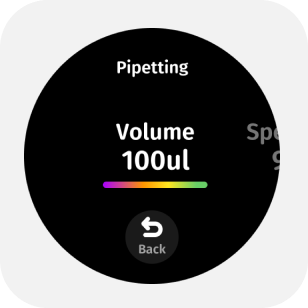
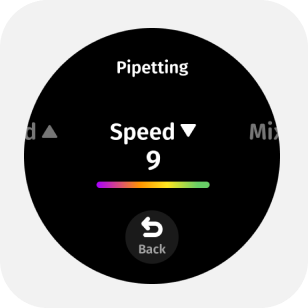

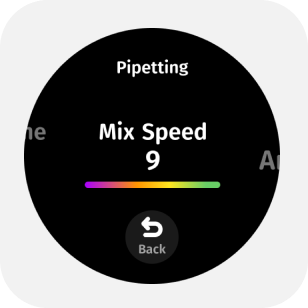
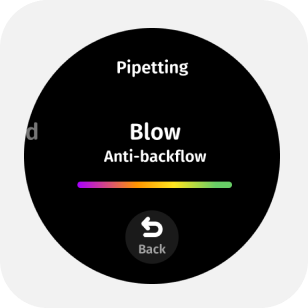
- Aspirate/dispense volume
- Aspirate and dispense speed
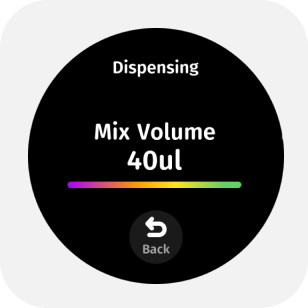
- Mixing volume
- Mixing speed
- Blow-out option
Once settings are complete, tap the "✔" on the screen or "Back" to confirm or return to the main page, or gently press the trigger button to confirm.
1.3 Install the Tip
Select a tip that matches the pipette's range, gently press, and insert the matching tip onto the nozzle.
1.4 Start Pipetting
Gently press the trigger to start the aspiration/dispensing operation.
1.5 Liquid Blow-Out
After completing the aspiration and dispensing cycle, double-click the trigger to blow out liquid.
1.6 Mixing
When there is no liquid in the tip, press and hold the trigger button to mix.
1.7 Tip Ejection
Press down the tip ejection button to remove the tip.
"Dispensing" Mode
Dispensing mode allow user to perform multiple equal-volume liquid dispensing with a single aspiration.
1. How to Use Dispensing Mode
1.1 Enter equal volume liquid separation mode
Select "Dispensing" mode under the home icon.
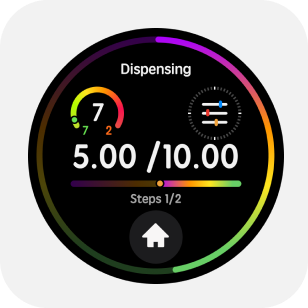
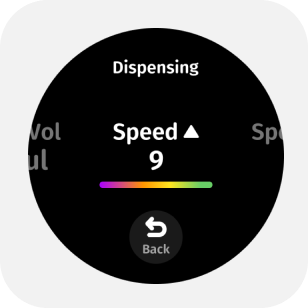
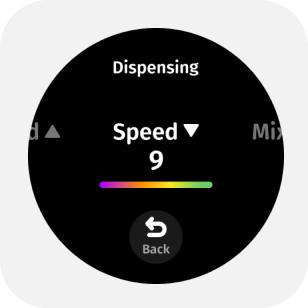
1.2 Parameter adjustment
When the device is not inhaling liquid, you can Tap anywhere on the main screen to enter the parameter menu.By swiping or tapping the screen, you can adjust in the parameter menu:


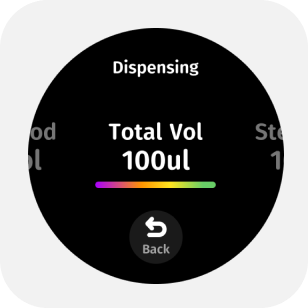


- Total volume or aliquot volume
- Number of aliquots
- Aspirate and dispense speeds
- Mixing volume
- Mixing speed
- Blow-out option
- Pre-dispense & tail-liquid on/off
In multiplication logic, you only need to set the dispensing volume and the number of dispenses; in division logic, you only need to set the total volume and the number of dispenses.
1.3 Start Dispensing
After immersing the tip in the liquid, lightly press the trigger to start aspiration;
Follow the on-screen prompts, pressing the trigger in sequence for pre-dispensing - dispensing - emptying the tail liquid.
You can disable pre-dispensing and tail liquid in the parameter settings. This operation may affect accuracy, so choose according to your actual needs.
1.4 Quickly Empty Liquid
Under dispensing mode, user can double click trigger button to empty all liquid.
1.5 Tip Ejection
Press down the tip ejection button to remove the tip.
1.6 Blow liquid
After completing the aspiration-dispensing cycle, you can double-click the trigger to blow liquid.
1.7 Mixing
When there is no liquid in the tip, press and hold the trigger button to mix.
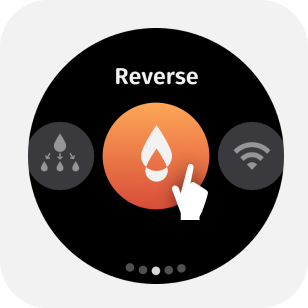
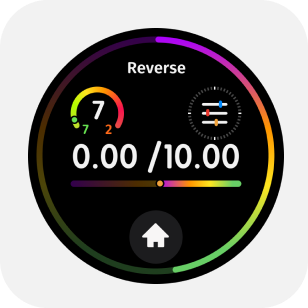
"Reverse" Mode
Reverse mode is suitable for viscous liquids, protein-rich solutions, and volatile liquids. In this mode, the system aspirates more than the set volume; the first dispense delivers the set volume, and the second dispense expels the excess as waste.
1. How to Use Reverse Mode
1.1 Enter Reverse Mode
Select [Reverse] in the mode menu to enter the reverse pipetting mode.
1.2 Parameter adjustment
Click the upper part of the main page screen to enter the parameter menu. By swiping or tapping the screen, you can adjust in the parameter menu:
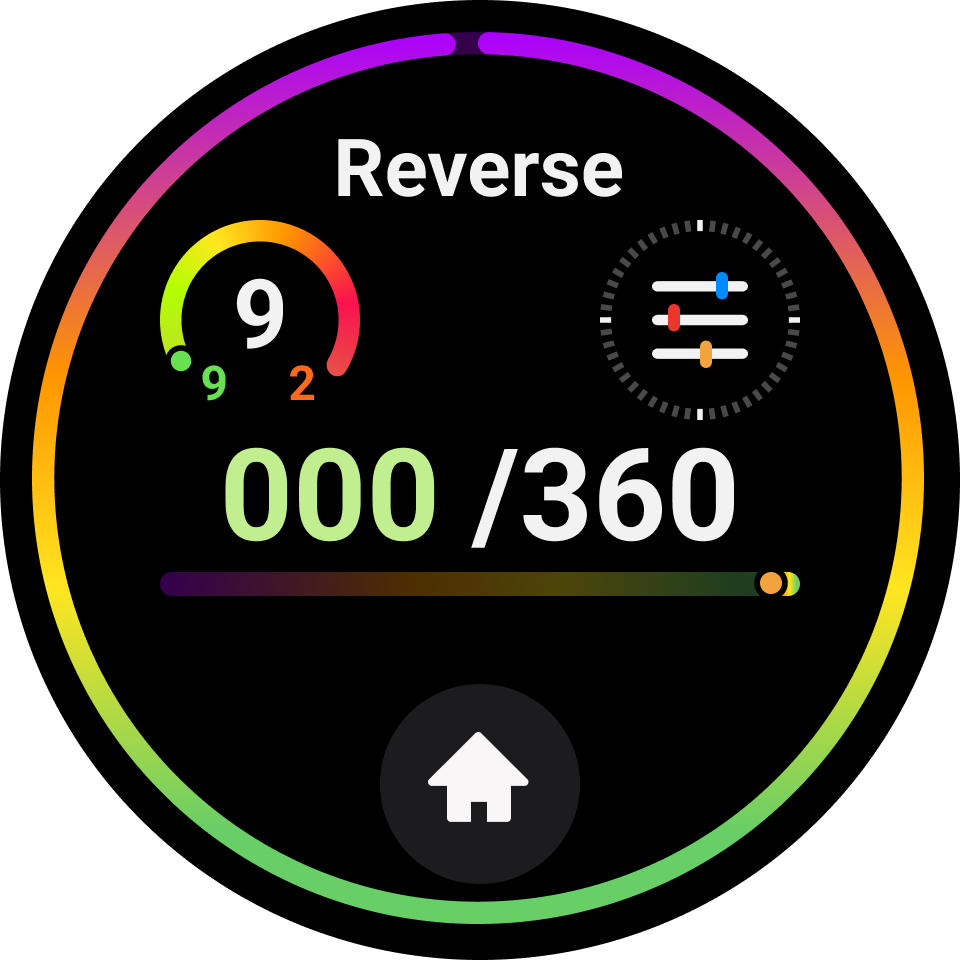

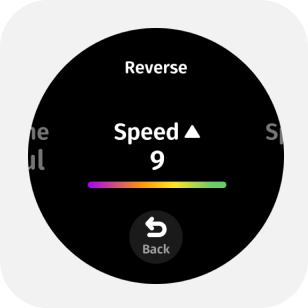
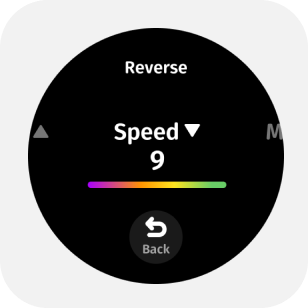
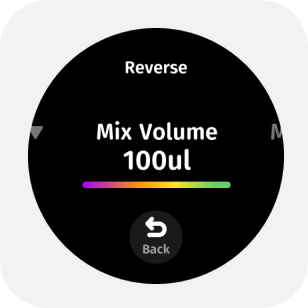

- Aspirate/dispense volume
- Aspirate and dispense speed
- Mixing volume
- Mixing speed
- Blow-out option
- Repeat aspiration on/off
1.3 Start Pipetting
After immersing the tip in the liquid, lightly press the trigger to start aspiration.
Press the trigger in sequence to perform [dispensing - emptying the tip].
To ensure each dispensing is more accurate, the intelligent pipette applies the reverse aspiration principle, where the device will aspirate an additional 10% of the set dispensing volume based on the already set dispensing volume. Therefore, after expelling a fixed volume, further expulsion of tail liquid is needed to truly empty it.
1.4 Blow Liquid
After completing the aspiration-dispensing cycle, double-click the trigger to blow liquid.
1.5 Mixing
When there is no liquid in the tip, press and hold the trigger button to mix.
1.6 Tip Ejection
Press down the tip ejection button to remove the tip.
AI voice assistant
AI voice function Command Reference list
Welcome to the voice assistant! Below are explanations of common operations and responses to help you use our device with ease.
Voice commands are not unique—try different ways of phrasing your request.
| Function | Adjustable Parameters | Example Voice Command |
|---|---|---|
Pipetting | Aspirate/Dispense Volume | "Set volume to XX" |
| Aspirate/Dispense Speed | "Set aspirate/dispense speed to XX" | |
| Auto Blow-out Switch | "Turn on/off auto blow-out","Turn on anti-backflow""turn on manual mode" | |
| Mix Volume | "Set mix volume to XX" | |
| Mix Speed | "Set mix speed to XX" | |
Dispensing | Total Volume | "Set total volume to XX" |
| Dispense count | "Set Dispense count to XX" | |
| Separation volume | "Set separation volume to XX" | |
| Mix Volume | "Set mix volume to XX" | |
| Mix Speed | "Set mix speed to XX" | |
Reverse | Aspirate Volume | "Set volume to XX" |
| Aspirate/Dispense Speed | "Set aspirate/dispense speed to XX" | |
| Auto Blow-out Switch | "Turn on/off auto blow-out" | |
| Mix Volume | "Set mix volume to XX" | |
| Mix Speed | "Set mix volume to XX" | |
| Repeat aspirate Switch | "Turn on/off repeat aspiration" | |
Mode Switching | Switch to Pipetting Mode | "Switch to pipetting mode" |
| Switch to Dispensing Mode | "Switch to dispensing mode" | |
| Switch to Reverse Mode | "Switch to reverse pipetting/reverse mode" | |
parameters Switching | Switch to Viscous Liquid Mode | "Viscous liquid mode" |
| Switch to Normal Liquid Mode | "Normal liquid mode" | |
Compound Command | Multiple commands executed together | "Set volume to 100, dispense 10 times, speed 7" |
| x µL divided into y times | "Dispense 100 microliters in 5 parts." | |
| "Set to 100 microliters split over 5 dispenses." | ||
| "I want 100 microliters, divided into 5 times." | ||
| x dispenses, y µL per dispense | "Set to 25 microliters per dispense, total 4 dispenses." | |
| "I want 4 dispenses of 25 microliters each." | ||
System Settings | Power Off | "Power off" |
| Sevice info | "Tell me device info" | |
| Serial number | "Check serial number" | |
| Battery | "How much battery leftWhat's the power level?Check battery" |
Charge
1. How to charge the device
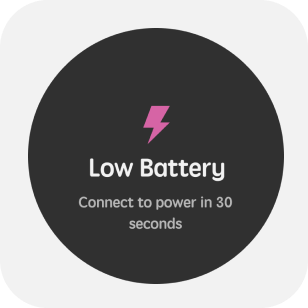
The @Pette Mini smart pipette can be connected to a charger at any time. It can be charged via a power adapter, a power bank, or by connecting to a computer through the Type-C port. During charging, the display shows a charging screen with the battery percentage. A 15-minute charge supports several hours of pipetting; a full charging cycle takes about 40 minutes and provides over 3,000 aspirate/dispense cycles (the count is lower for high-volume models).
1.1 Dispensing While Charging
The @Pette Mini can perform operations during charging; while in charging mode, lightly touch the charging interface to return to the previous page before charging. If you need to handle liquids while charging, we recommend using the original charging device to power the pipette.The @Pette Mini can perform operations during charging; while in charging mode, lightly touch the charging interface to return to the previous page before charging. If you need to handle liquids while charging, we recommend using the original charging device to power the pipette.
1.2 Memory System, Power and Management Settings
All user input changes to the @Pette Mini settings and service mode data are stored in flash memory. Therefore, these contents will be preserved in case of battery failure or removal.
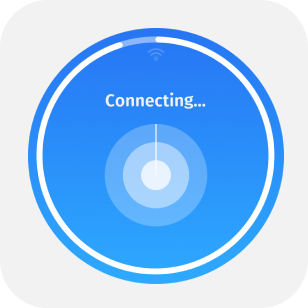
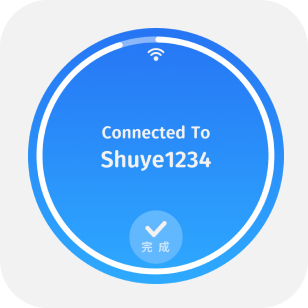
Network & Pairing
1. How to network for equipment
The @Pette Mini smart pipette's voice assistant feature relies on AI large model data and can only be operated in online mode.
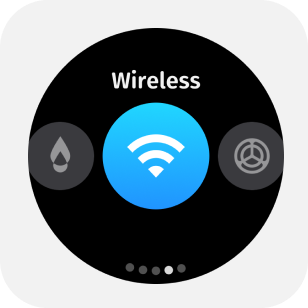
1. Press the "Home" button on the main screen to enter the "Mode" menu.
Tap on Wireless Connection and select Device Configuration.
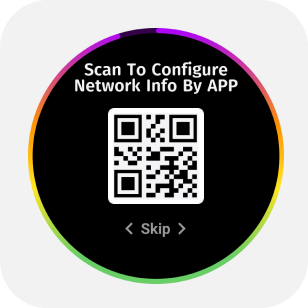
2. Open the Pipette Assistant app, tap on Device Configuration on the main page, and scan the QR code on the pipette screen to connect.
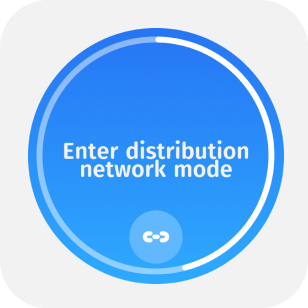
3. The pipette screen shows that it is entering configuration mode. Select the Wi-Fi name, enter the correct password, and tap to send to the pipette. Wait a few seconds until the pipette displays that it is connected to complete the network operation.
@ Pette Mini technical parameters
Measurement Results of @ Pette mini Single Channel Pipette (National Standard Verification Regulation/JJG 646-2006)
| Vecverse @Pette Mini single-channel, variable volume | National standard calibration regulations/JJG 646-2006 | ||||||
|---|---|---|---|---|---|---|---|
| Order NO. | Range of dispensing | Accuracy assurance range | Volume | Volume Error | Repeatability Error | Volume Error | Repeatability Error |
| 0120-0010 | 0.5μL-10μL | 0.5μL-10μL | 1μL | ±1.50% | ≤2.00% | ±12.0% | ≤6.0% |
| 5μL | ±0.30% | ≤0.6% | ±8.0% | ≤4.0% | |||
| 10μL | ±0.30% | ≤0.2% | ±8.0% | ≤4.0% | |||
| 0120-0100 | 2μL-100μL | 5μL-100μL | 10μL | ±0.50% | ≤0.50% | ±8.0% | ≤4.0% |
| 50μL | ±0.30% | ≤0.40% | ±3.0% | ≤1.5% | |||
| 100μL | ±0.20% | ≤0.20% | ±2.0% | ≤1.0% | |||
| 0120-0200 | 5μL-200μL | 20μL-200μL | 20μL | ±2.00% | ≤0.80% | ±4.0% | ≤2.0% |
| 100μL | ±1.00% | ≤0.50% | ±2.0% | ≤1.0% | |||
| 200μL | ±0.50% | ≤0.30% | ±1.5% | ≤1.0% | |||
| 0120-0300 | 5μL-300μL | 30μL-300μL | 50μL | ±0.60% | ≤0.40% | ±3.0% | ≤1.5% |
| 150μL | ±0.40% | ≤0.15% | ±2.0% | ≤1.0% | |||
| 300μL | ±0.40% | ≤0.15% | ±1.5% | ≤1.0% | |||
| 0120-1000 | 10μL-1000μL | 50μL-1000μL | 100μL | ±0.50% | ≤0.50% | ±2.0% | ≤1.0% |
| 500μL | ±0.15% | ≤0.20% | ±1.0% | ≤0.5% | |||
| 1000μL | ±0.15% | ≤0.20% | ±1.0% | ≤0.5% | |||
The above test data are averages from multiple repeated tests conducted under specific environmental conditions at Shuye Laboratory.
Usage Recommendations
1. Using pipettes
1.1 The use of pipettes should follow these guidelines:
- Set the pipette volume within the specified range and use compatible tips.
- To ensure accuracy, use high-quality, uncontaminated tips.
- Keep the immersion depth of the tip consistent or similar each time you aspirate.
- Maintain the pipette vertically or at an angle of no more than 20 degrees from vertical.
- Pre-wetting (1-3 times) the tip can improve pipetting accuracy.
- Never invert or lay the pipette flat when there is liquid in the tip. Always keep the instrument vertical and store it as vertically as possible.
- Liquid must not enter the areas that contact the piston or seal, as well as the electronic components including the display, trigger button, and eject button.
- Do not use corrosive solvents to clean the pipette. When cleaning, it is best to use a damp cloth (with diluted mild detergent) that is not cotton.
- Ensure that the display, trigger button, and eject button are dry.
The smart pipette is an advanced laboratory product that requires careful maintenance; please operate according to the guidelines.
1.2 Tip Immersion Depth
The immersion depth of the tip is critical. If it exceeds the recommended depth, the measured volume may be inaccurate and exceed standards. The angle of the tip is also important.
The recommended insertion depths for each model of sample are as follows:
| Volume Range | Immersion Depth |
|---|---|
| 0.1-1 µL | 1mm |
| 1-100 µL | 2-3mm |
| 100-1000 µL | 2-4mm |
1.3 Grip
@Pette Mini does not restrict your grip position; you can choose any grip style you prefer for holding the pipette.
2. Possible Causes of Malfunction and Solutions
| Issue | Possible Cause | Suggested Solution |
|---|---|---|
| Tip ejector does not reset after ejection | System failure or spring malfunction | Contact customer service for inspection; the tip ejector reset spring may need to be replaced if necessary. |
| Screen touch failure | System failure. Dropping or impact may cause the connector to come loose or the screen module to be damaged. | Please contact customer service for inspection; the screen module may need to be replaced if necessary. |
| Button failure | System failure. Forcefully pressing the aspirate/dispense button may cause the button to malfunction. | Contact customer service for inspection; the button or securing components may need to be replaced if necessary. |
About Warranty
1. Basic Information on Product Warranty
Thank you for purchasing a Shuye product. If you encounter any performance faults not caused by human damage during the use of the product, you are entitled to Shuye's worry-free after-sales service commitment. To protect your rights, please keep the purchase receipt and invoice safe after buying Shuye products. The warranty period for the product will start from the date you activate the product (hereinafter referred to as "activation"), and the warranty period is 24 months.
If the product malfunctions, please contact Shuye after-sales support directly.
1.1 Worry-Free After-Sales Service Content
- Within 15 days from the date of activation, the product can be replaced with products of the same model and specification if no one is damaged.
- Within 15 days from the date of activation, if the product has a performance fault without human damage, it can be replaced with a product of the same model and specifications.
- During the warranty period, if the product cannot be used normally after two replacements, and after confirmation by Shuye, you may choose to repair or replace it with a product of the same model and specifications, provided you have a valid replacement record from the seller in your warranty certificate.
1.2 Situations Not Covered by Warranty
- The product is beyond the warranty period;
- The warranty certificate does not match the product model;
- Products without Shuye branding;
- The accessory was not purchased from Shuye or an authorized dealer;
- Product cleaning or normal maintenance;
- Unauthorized repairs, modifications, misuse, collisions, compression, or liquid ingress;
- Damage caused by accidents, abuse (including exceeding workload), or misuse;
- Damage caused by improper storage (such as rodent damage, liquid ingress, etc.);
- Damage caused by using self-compiled or non-publicly released software that prevents the product from functioning normally;
- Damage caused by force majeure such as floods, fires, or lightning;
- Defects caused by normal wear and tear or aging of the product;
- Shuye products not sold in mainland China.
1.3 Special Reminder
The above terms outline all responsibilities of Shuye regarding the product and replace all other express and implied guarantees and responsibilities. When the product does not work properly, Shuye's responsibility to the user is limited to repairing and replacing the product according to the above terms. Beyond this, there are no other guarantees. If applicable national laws provide otherwise, Shuye will comply with the law.
Regardless of the reason for the user's inability to use Shuye products normally, Shuye is only liable for the responsibilities required by applicable national laws.
Under no circumstances shall Shuye be liable for losses caused by the user's product loss, damage to intangible assets such as data records, materials, and/or programs; or losses caused by third-party compensation claims against the user.
1.4 Product After-Sales Service Commitment Schedule
| Product Type | Warranty Period |
|---|---|
| Pipette | 24 months |
Random accessories such as power supplies and power cords are not covered by the warranty. | |
Frequently asked question
1. Q&A | Technical Related
1.1 What are the main differences between electric pipettes and smart pipettes?
Electric pipettes simplify the pipetting process compared to mechanical pipettes, improving handling efficiency, with higher precision and repeatability, reducing operator fatigue.
Shuye smart pipettes, based on electric pipettes, offer faster and richer operating functions, featuring AI smart interaction, data management, connectivity, automation expansion, and other outstanding characteristics.
1.2 What is "Taylor-style" self-calibration?
It is an innovative self-calibration technology of the PetteOS system, supported by both hardware and software. The Shuye smart pipette has built-in calibration components that, in conjunction with PetteOS, can achieve automatic calibration after each aspiration and dispensing without external intervention. Similar to Taylor expansion, it distributes periodic calibration tasks across each aspiration and dispensing operation, achieving fully automatic calibration for each pipetting.
1.3 What are the specific features of smart pipettes?
The Shuye smart pipette is equipped with the PettOs system, utilizing ARM architecture chips and integrating multiple driving algorithms, enabling various seamless connection modes.
The Pro series supports: NFC wireless data reading, which helps you manage permissions, inventory checks, and export pipette-related information; Bluetooth wireless control, allowing you to control the pipette via mini-programs and tablets, and also supports automation expansion, such as automated pipetting workstations and pipetting plate kits.
The Mini series, in addition to supporting Bluetooth wireless connection, has a built-in AI voice interaction model, allowing users to adjust pipette parameters, switch modes, and even set voice memos, alarms, and logical Q&A through voice commands.
1.4 Why is there no shortcut key for shutdown?
The Shuye smart pipette has a function to automatically shut down after a long period of inactivity (3-30 minutes), and the automatic shutdown time is adjustable. It also features strong battery life and fast charging, so you do not need to perform a special shutdown operation after pipetting.
The Mini series can be shut down via voice control; you can press and hold the voice button and say: "Shut down."
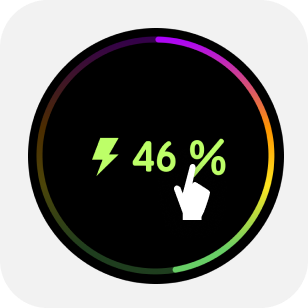
1.5 How can I check the remaining battery?
The working interface when starting pipetting and the light ring displayed when the charger is plugged in indicate the remaining battery.
1.6 What could be the reason for the tip not ejecting?
Shuye pipettes use universal tip technology and have excellent compatibility; with support from both software and hardware, electric tip ejection has also been achieved. Currently, there are many types of tips on the market, and the variety of processes is rich. When matching tips with less obvious limits, if you apply too much force, causing abnormal deformation of the tip, it may be difficult to eject. It is recommended to use appropriate force and standardized operations to take the tips.
1.7 Why is there occasionally residue after dispensing?
Due to the effects of liquid surface tension, viscosity, and tip adhesion, there may be residue during aspiration and dispensing. Considering this, we have designed a blow-out procedure, which you can perform based on actual needs. Additionally, it is recommended to use low-adhesion tips to reduce the impact of the tips themselves; when handling special liquids, using reverse pipetting mode can achieve more accurate pipetting results.
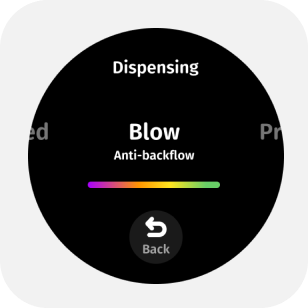
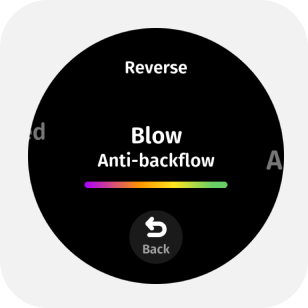
1.8 What should I do if liquid is drawn back after performing the blow-out?
After performing the blow-out operation, due to motor reset, a backflow phenomenon may occur.
You can double-click the trigger button and hold it down until the tip leaves the liquid surface, then release it to delay the motor reset.
Alternatively, users can enable the anti-backflow mode in the settings under "Blow". When this mode is activated, the motor will not reset automatically after the pipette has completed the blowout. The user will need to manually press the aspirate/discharge button after the pipette tip is clear of the liquid surface to reset the motor, which greatly reduces the risk of liquid backflow.
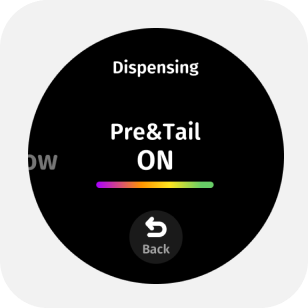
1.9 In the dispensing mode, is the discarded pre-dispensed liquid and tail liquid volume included in the set total volume?
No, the dispensing mode of the Shuye smart pipette will automatically aspirate liquid greater than the preset volume, discarding the first and last liquid to improve dispensing accuracy.
Users can also choose whether to include the pre-aspirated and tail liquid in the settings under "Pre&Tail". If this option is turned off, the pipette will not aspirate excess liquid beyond the preset volume during dispensing and will perform the dispensing directly. However, this may affect the accuracy of dispensing, so please adjust according to your specific needs.
1.10 What should I do if there is suspended liquid during the dispensing operation?
Due to surface tension of the liquid, there may be a drop of suspended liquid after each dispensing when performing small volume liquid dispensing operations. If this occurs, it is recommended to lightly touch the liquid surface or the tube wall to let the suspended drop enter the current dispensing.
1.11 What do the values of the three calibration points mean?
The three-point calibration method tests six times at three points selected based on the pipette's range: 10%, 50%, and 100% of the maximum range, taking the average value of each test point. The values of the three calibration points are the average values of the three measured detection points, representing the actual volume of the pipette, and the system will adjust based on the calibration point data to ensure that the volume you aspirate matches the displayed volume.
1.12 Why can't I connect the pipette after scanning the QR code on on WeChat or APP?
The Shuye smart pipette connects to the "Shuye Pipette Assistant" on WeChat or APP via Bluetooth, so you need to ensure that the pipette's Bluetooth, your phone's Bluetooth, and WeChat or APP's Bluetooth permissions are enabled.
1.13 How do I disinfect and sterilize the pipette?
The Shuye smart pipette Pro series has a detachable lower part that supports high-pressure heating sterilization at 121°C for 15-20 minutes. Do not high-pressure heat any parts other than the pipette or the tip ejector.
The Shuye smart pipette Pro and Mini series support alcohol spraying and UV sterilization for the entire pipette.
1.14 Do I need to calibrate the pipette regularly?
The Shuye smart pipette has a built-in self-developed "Taylor" self-calibration system, with the Pro series achieving automatic reset after each pipetting, and the Mini series achieving cloud calibration at each startup. Each pipette is calibrated according to JJG646-2006 and ISO 8655 standards before leaving the factory, and a factory calibration report is provided.
However, due to the frequency of pipette use, the types of liquids handled, and the user's usage methods, it is recommended that you perform proactive calibration maintenance using the system's built-in three-point calibration system every six months to a year to ensure your pipette remains at a high precision level. For specific operations, you can refer to the calibration operation demonstration video on the official website. If you have any questions, feel free to contact us!
1.15 What type of tips should I choose?
The pipetting system consists of two parts: the pipette and the tips, and the quality of the tips significantly affects the accuracy of pipetting. Shuye pipettes use universal tip technology and have excellent compatibility, so it is recommended that you choose high-quality tips with low adhesion and no contamination based on the experimental scenario to achieve more precise pipetting.
1.16 How long does it take to fully charge the Shuye smart pipette? How long can it be used after charging?
@Pette Pro smart pipette uses fast charging, reaching a full charge in just 1 hour. A full charge supports 4,000+ aspirate/dispense cycles. It also supports charging while in use and features an overnight charging protection mechanism to ease power concerns.
@Pette Mini smart pipette uses fast charging, with a full charging cycle of about 40 minutes, providing up to 3,000+ aspirate/dispense cycles (fewer cycles for high-volume models). It also supports charging while in use and features an overnight charging protection mechanism to ease power concerns.
2. Q&A | Principles and Applications
2.1 How does the @Pette Mini work?
The @Pette Mini smart pipette is an innovative upgrade based on electric pipettes, enhancing the user experience with the latest generation of intelligent connectivity. It interacts seamlessly and efficiently with users through built-in pipetting system software, utilizing various driving algorithms to control high-precision motors for operations such as aspiration, dispensing, aliquoting, mixing, and tip ejection, thereby improving user experience, increasing work efficiency, and reducing work-related strain. Additionally, as it is motor-driven, the speed of aspiration, dispensing, and mixing becomes highly controllable, catering to the personalized needs of different experimental protocols. The smart pipette can also connect wirelessly or via wired interfaces to external components, expanding its functionalities. It can leverage intelligent connectivity for device scanning registration, calibration information operation log export/viewing.
2.2 What are the use cases for the @Pette Mini?
Pipettes are commonly used laboratory tools in fields such as life sciences, biomedicine, and chemical analysis, capable of accurately dispensing and transferring small volumes of liquid samples. In laboratories, pipettes are widely applied in areas such as PCR reactions, protein analysis, cell culture, genetic engineering, and high-throughput screening, covering the entire process from sample preparation to sample analysis.
3.Q&A | After-Sales Service
@Pette Technology offers a comprehensive range of business services including: maintenance, training, application support, technical support, and assistance.
3.1 Can I request @Pette to recalibrate the pipette after purchase?
We are happy to provide various calibration services to calibrate your pipette according to standards. You can contact our service team through the following means to inquire about any issues you may encounter.
Email: service@vecverse.com
3.2 What is the warranty period for the @Pette smart pipette?
For any quality issues within 2 years, all return shipping costs will be covered by @Pette.
*Excluding charging cables and chargers.
For pipettes within the warranty period, if they are damaged due to misuse of physical or chemical substances, or if they have been repaired or recalibrated by any service organization not authorized by Hangzhou @Pette Technology Co., Ltd., the warranty will be void.